Building an app is a pretty exciting thing. It’s tempting to just jump on it and start coding, since it could be something you can conquer the world with.
Well, no matter how tempting it is, slow down a bit.
You need to be clear about these basic things before you start building your app. You don’t want to build something no one wants to use, right?
Which is why it requires some planning, validation and prioritisation before you even start coding.
I know, as a startup you can’t really have a road map for months (especially in the beginning), but you need to have at least concrete specifications, a priority list, mockups, and user stories for the next milestone.
In this post, we put together 7 things that you should do before coding your app.
Use these links to jump to the specific parts:
1. Talk with your target users before building an app

I know, it’s boring.
Everyone says this but with good reason: it’s super important!
Since everything starts from your target users, this is the foundation for your app. You need to know your target users in order to solve their real problems or satisfy their needs.
Here is how the process looks:
Step 1:
You sit down with your team and figure out the ideal user(s) for your app. Write down your hypotheses, assumptions and every piece of information you know about them. You can use this buyer persona template when creating user segments. But you shouldn’t stop here.
Step 2:
With a bunch of assumptions and user segments, the next step is to talk with your target users. The reason is quite simple: we can’t base our app on our assumptions. These need to be validated or invalidated first. These small interviews/talks help you better understand what they think and also uncover pains and needs you can address with your app.
Further resources:
What your users say and what they actually do is very different. You need to figure out if the problem or need uncovered during the interviews is worth taking action.
Once we have a problem or need identified, we need to dig deeper to supply a solution that solves that problem or need.
2. Build a minimum viable app you need

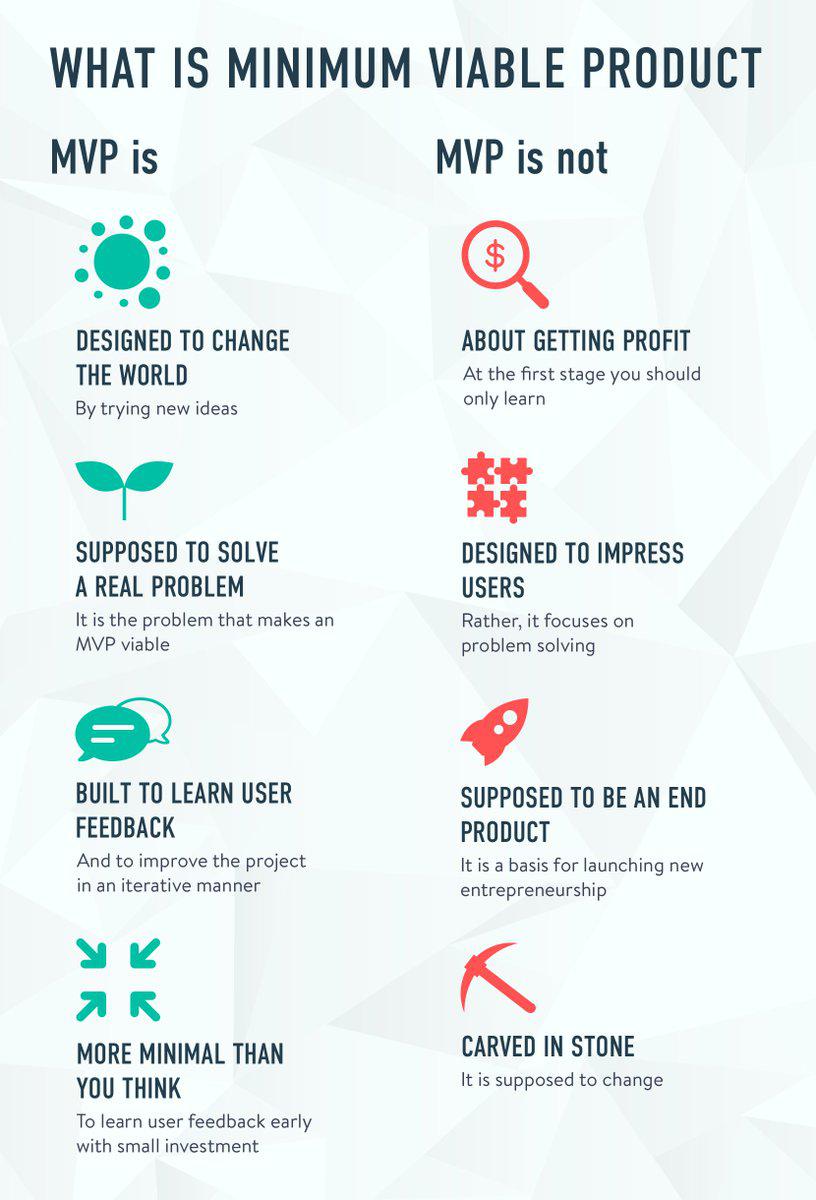
The minimum viable product (MVP) is a product with just enough features to satisfy early customers, and to provide feedback for future development. Wikipedia
A minimum viable product (MVP) consists only of the most crucial features. Its purpose is quite simple: test and validate or invalidate assumptions about your product.
An MVP can exist in different forms, and these allow you to test your assumptions/features in different levels.
What is the most valuable part of your app? Skip the fancy features and focus on those that deliver the key benefits. A great way to do it is by using story mapping:
1. What is the primary goal of your app?
- Since you’ve already uncovered the pain points of your target users, the question is, what kind of problem does your app solve? What is the one thing that makes it a must-have app?

2. Define the process users will use to solve their problems
- Once you know what problems you’re solving, then you should take a step further and decompose the process of how users will do it. What are the exact steps?

3. Define the features based on this process
- Alright, we know the exact steps and actions a user needs to take. Now, you need to translate these actions/steps into features.
- Feel free to brainstorm on features for every stage of your project. This leaves you with a bunch of features that can be implemented at different stages of the problem-solving process.

4. Prioritize features
- The real question is what feature to start with. You need to create a priority list for every stage, starting with the most crucial features that are indispensable parts of your solution.
- To successfully prioritize the features, consider the following questions:
- How important is this feature for finishing the process?
- How often will the feature be used?
- How many users will use this feature?
- How much value will the feature bring to the customer?
- How risky is this feature?

5. Separate nice-to-haves from must-haves
Once you have the priority list ready, the hardest part is to separate the must-have features from the nice-to-haves. The end result should be a sort of roadmap containing the set of minimum features that help your users solve their most burning issue.

Chances are that your first MVP plan won’t be perfect; usually, it’s far from perfect. You need to get real users who are happy to try out your app and to give you feedback to set a validated direction for you app. See the next steps on how to get beta testers.
You should go through the process over and over again based on the user’s suggestions and feedback. If you learn quicker, you can build a much better product.
Further reading:
3. Create user stories

User stories are great to capture app functionality from the end user’s perspective. They clearly show what a specific user type can do with an application.
Each user story has to define the following:
- User type (for example: admin)
- User’s intention
- Value they get (from a specific feature)
But why should you care about user stories? Here are some reasons to convince you:
- Clarifies software functionality
- Easier to understand
- Easier to remember
- Easier to express business value
- Makes product prioritization easier
So what should a user story contain? How does a user story look like? Here is the structure you should follow:
- Who is the user?
- What is his intention?
- What value does he get from it?
Here is a template: As a <user_type>, I want <his goal> so that <benefit, value>
Example: As a user, I want to add and edit my contact details so I can keep them up to date.
Bill Wake introduced a framework that helps everyone create good user stories. It’s called INVEST:
- Independent: Each story should be independent (no overlapping) so it can be developed and delivered separately
- Negotiable: Details will be clarified by the cooperation of the developers and customers
- Valuable: It needs to be valuable for the users
- Estimable: The story should be estimated. It doesn’t have to set an exact time frame, just a good estimate to schedule it in the project
- Small: The stories need to be small enough to accurately estimate the work it requires
- Testable: It needs to be tested easily, which also indicates that the requirements are well-defined
4. App design and user interface

You have the user stories ready and a prioritised list of features. The missing chain is…you guessed it: design.
There are pretty cool tools out there for creating wireframes or mockups and even prototypes for your app.
I’m sure I don’t have to convince you that creating a mockup or early prototype of your app is a must. You can easily explore and compare design variations and make design-related decisions faster than rewriting the code over and over again.
You can speed up development since your developers don’t have to spend their valuable time on figuring out the design. It’s especially useful when you outsource app development and want to make sure the app will look like and function as you imagined.
5. Get people early for feedback

I bet, you want to follow lean and agile methodologies during the app development. It means that you have to test and validate app features. That means you have to check it with real users, your target users to make sure you’re on the right track.
Even if you don’t have any kind of application ready or in progress, you still have to start gathering beta testers for your app.
Getting users to your app is really marketing stuff, and not a tech-related thing. But here are some quick tips you can try.
- Find users on social media (Facebook, LinkedIn, Google Plus groups) Submit your startup/app to startup directories such as Betalist. Here is a full list.
- Try beta testing services
- Use your network to gather beta testers (invite relevant friends, family members, etc.)
- Use communities such as Reddit:
- /r/TestMyApp
/r/alphaandbetausers
- /r/AndroidAppTesters
- /r/startups
- /r/TestMyApp
More resources:
6. Choosing the right app development company

There is a point when you have to decide if you want to do the app development inhouse or hire a freelancer or a software development company to do it. If you decide to outsource software development, here are the most important things you need to clarify first before you decide to go with one.
Technologies/tools they use: Always ask/research what technologies they use. Software development-related technologies and tools aren’t the only things that matter, but also tools used for communication and project management. This gives you a better understanding of their workflow and practices.
References: Does the company have any references showing that they’re doing stuff? Obviously, you don’t have to be a rocket scientist to put fake projects on a website, so here are two things you can do:
- Search for case studies showing more details about the projects and technologies they are familiar with.
- Get in touch with the companies they have worked with. This is pretty sneaky but they can give you first-hand feedback on how your potential partner works and handles product development related issues. Make sure to ask them about their experience, such as what went wrong and what went well during the project.
Testimonials: Testimonials from clients build trust. You can also take it one step further by getting in touch with the person who was quoted. This way, they can provide valuable information than just a few-sentence testimonial.
Time-zone difference: In many cases, your software partner is based far away from your country (that’s called offshore). Make sure to clarify how you will handle communication and when you have dedicated times for regular meetings and collaboration. Time-zone difference requires flexibility from your outsourcing partner and from your own team as well.
Idea protection (NDA): Chances are your software development agency doesn’t know your market and doesn’t have the necessary resources to make it work. You know your market much better than your outsourcing partner. Just to put a legal protection behind your project, I recommend you make a nondisclosure agreement (NDA) with your software development partner (this is what we do with our clients at Coding Sans).
Signing a nondisclosure agreement doesn’t require a huge effort from your outsourcing partner. Here you can download a free template.
Test projects: Fast results build trust. Do they offer a sample project? If they do, that’s a big, big plus. With a test project, you can see exactly how your outsourcing partner works and how the communication and coordination go. This is the best way to get the essence of mutual work. We also offer a free sprint for our clients, which means that if they’re not satisfied with our results, then the sprint is free.
Code guarantee: Does the company offer a guarantee on their code ship? If yes, how long is that period of live support?
7. Figure out how to keep users engaged

You need to think about app engagement and retention way before you start working on it or start getting new users. Eventually, you want to create an app that people love to use and one that becomes part of their everyday lives.
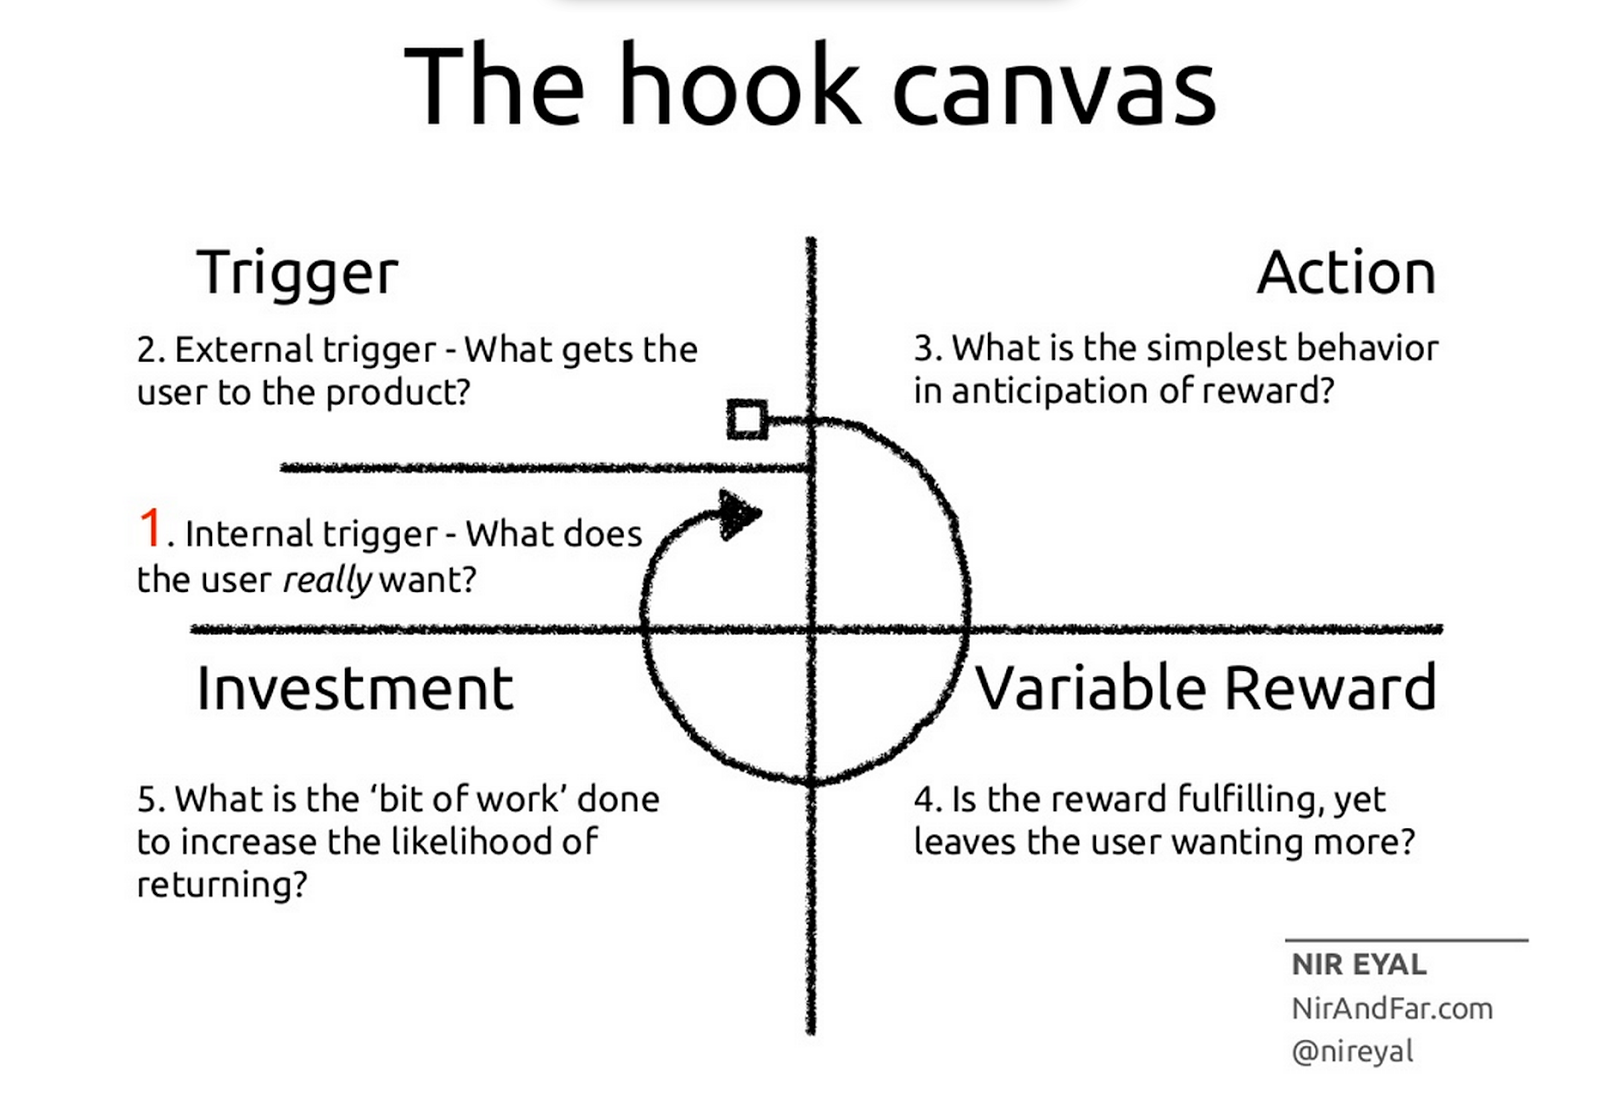
In his book Hook, Nir Eyal came up with a framework that helps create habit-forming products.
The model is made up of 4 steps.

Trigger
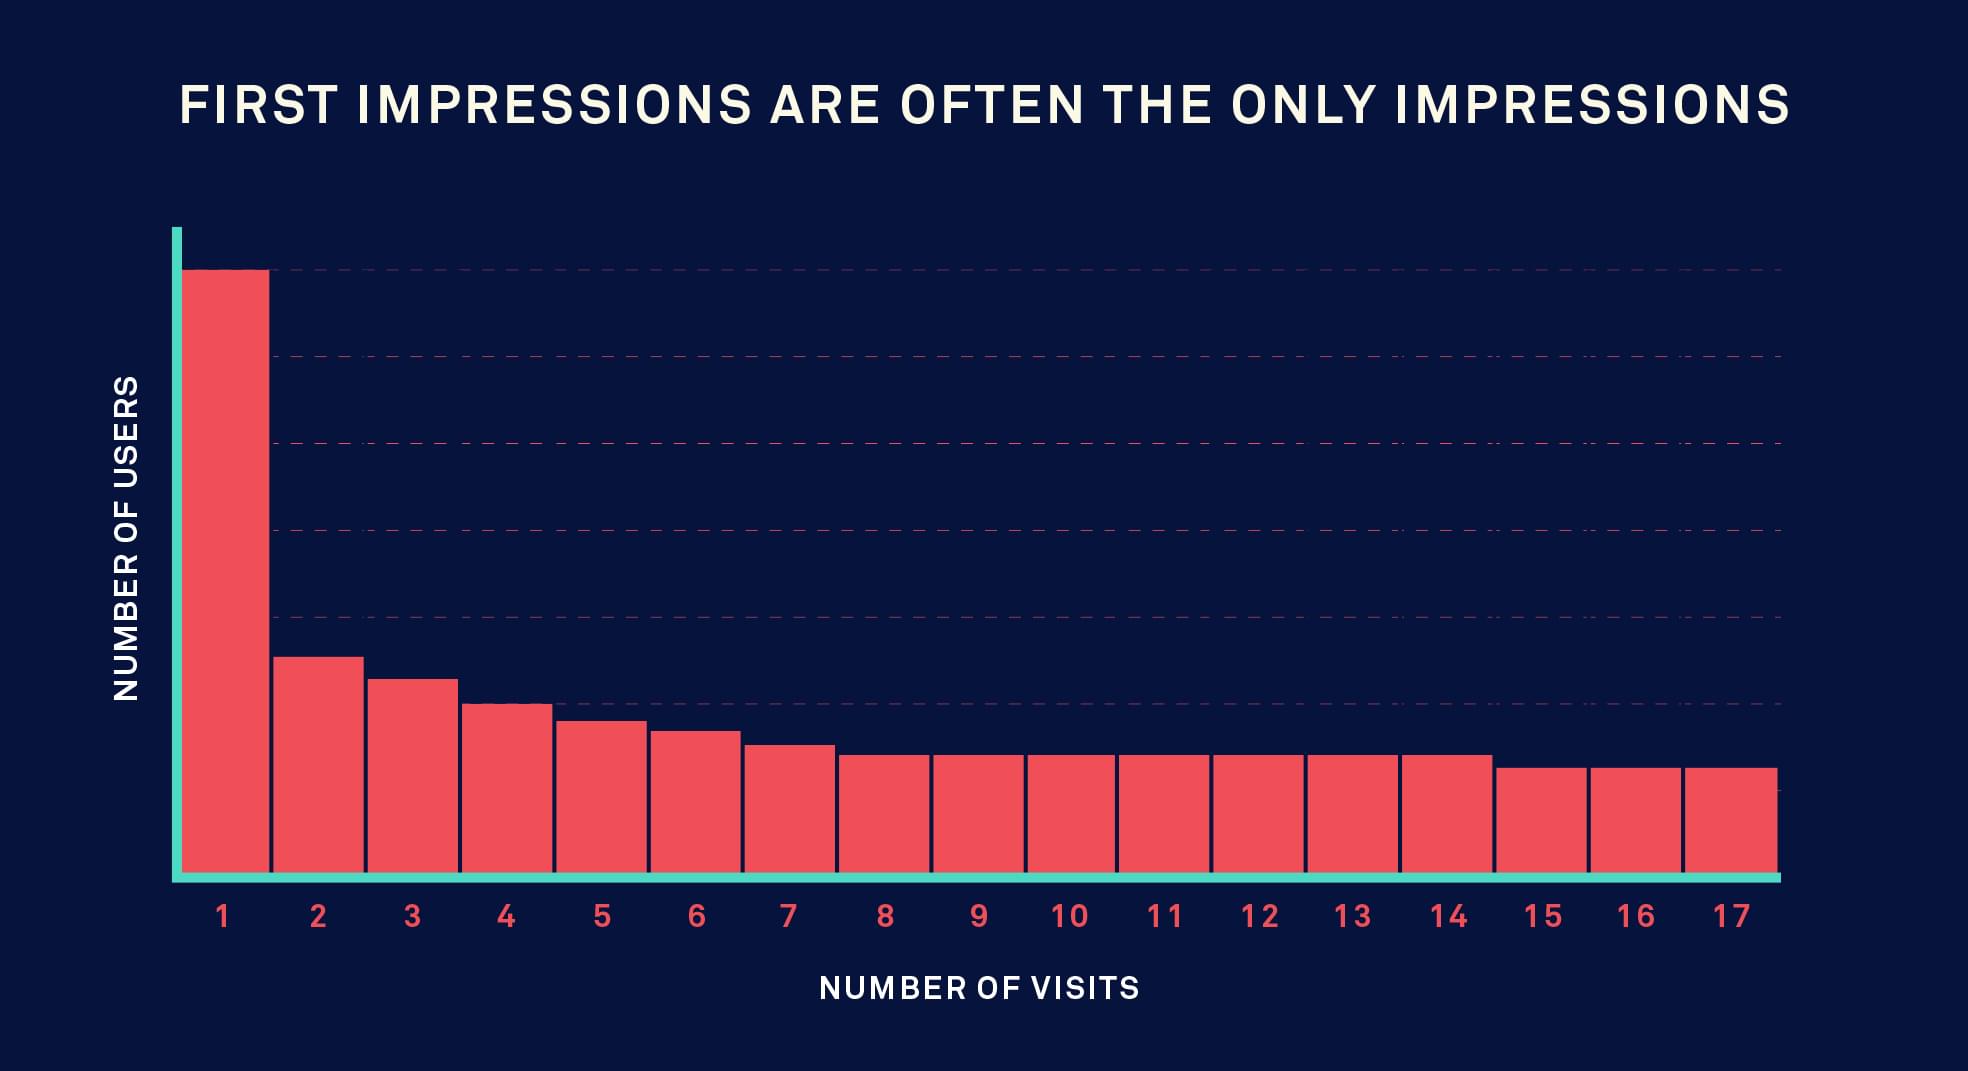
First impression is often the last impression as this image shows below.
A fair proportion of users abandon applications after the first visit and never come back. 67% of customer churn could be avoided if the business resolved the customer’s issue during their first interaction.
A trigger is when something entices your users to get back and take an action in your app. The question is, what triggers can you apply?
External, for example:
- Push notifications
- Retargeting
- In-app messaging
- Gamification
Internal, such as:
- Thoughts
- Places
- Memories
- People
- Emotions
- Routines
Want to make sure your app is engaging? Check out our heavy guide on app engagement.
Action
After a successful trigger, the user needs to take an action. This is the minimum interaction to get a reward. The most crucial thing here is to make the action as quick and effortless as you possibly can.
Here are some action examples:
- Facebook: scrolling through your Facebook News Feed
- Uber: getting a ride on Uber with a tap of a button
- Google: searching for something and receiving answers and information
Variable reward
The reward is the why and the objective for the user.
- How do you reward the user?
- Is there interesting variability?
These rewards can be:
- Social rewards (tribe):
- Empathetic joy
- Partnership
- Competition
- Search for resources (hunt): hunting for clothes, prizes, information.
- Search for self-achievement (leveling up): improving, mastery and competency.
Pro tip: Build variable rewards to scratch the user’s itch, but leave them wanting more.
Investment
Once the user gets his reward, the next step is to get the user to invest, setting themselves up for the next trigger, storing value, and creating preference. This investment can be money, time, effort, personal data, and emotional commitment.
How does it work?
1. Investment loads the next trigger of the hook: For example, you receive a new message on Messenger or a notification on Facebook (these are external triggers to get back to the app).
2. Investment stores value: Users get more content on your app, more followers, more friends or information.
Conclusion
Honestly, the hardest part is not building the app but rather figuring out the right thing to build.
Listening to your users carefully will help you stay on the right track. Creating user stories and prototypes (mockups) make your app much easier to understand and iterate on visual ideas, no matter if you work with in-house developers or outsource the process fully or partly.


